Rust challenge 58/100 - making the generic node light up
Table of content
What is this 
The rules of the game are explained in my original.
58th Challenge
Challenge
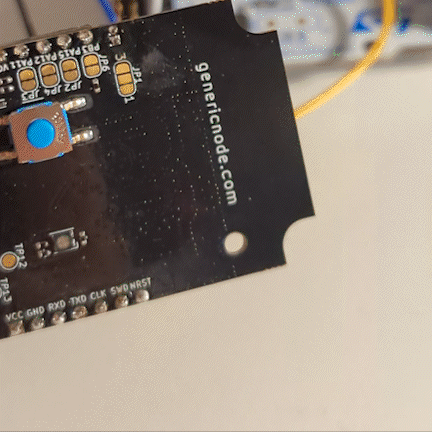
Build on yesterday’s example and use the rgb led to make things light up! Here is a picture of the generic node again. Its a piece of hardware with an STM32WL5x and has a bunch of sensors and actuators as well as the possibility to use LoRaWAN.
Solution 
Lets start from a template again, same folder as yesterday.
    cargo generate \
    --git https://github.com/stm32-rs/stm32wlxx-hal\
    --name stm32
The template, looks like this, when running tree -L 3
    .
    ├── CHANGELOG.md
    ├── Cargo.lock
    ├── Cargo.toml
    ├── LICENSE-APACHE
    ├── LICENSE-MIT
    ├── README.md
    ├── examples
    │   ├── Cargo.toml
    │   ├── examples
    │   └── src
    ├── hal
    │   ├── Cargo.toml
    │   └── src
    ├── lora-e5-bsp
    │   ├── Cargo.toml
    │   ├── README.md
    │   └── src
    ├── memory.x
    ├── nucleo-wl55jc-bsp
    │   ├── Cargo.toml
    │   ├── README.md
    │   └── src
    ├── rustfmt.toml
    └── testsuite
        ├── Cargo.toml
        ├── README.md
        ├── runall.py
        └── src
To keep things simple, we will add an additional example, instead of doing something complicated, same as last time. The led is actually 3 leds (RGB) According to the documentation
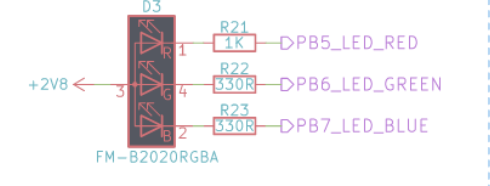
So the leds are connected to PB5 (red) PB6 (green) and PB7 (blue).
    $ DEFMT_LOG=trace cargo run-ex gpio-rgbled
        Blocking waiting for file lock on build directory
       Compiling defmt-macros v0.3.2
       Compiling defmt v0.3.2
       Compiling panic-probe v0.3.0
       Compiling defmt-rtt v0.3.2
       Compiling stm32wlxx-hal v0.6.1 (/Volumes/data/4_github/learn-rust/stm32wlxx-hal/hal)
       Compiling examples v0.1.0 (/Volumes/data/4_github/learn-rust/stm32wlxx-hal/examples)
        Finished dev [optimized + debuginfo] target(s) in 13.03s
         Running `probe-run --chip STM32WLE5JCIx --connect-under-reset target/thumbv7em-none-eabi/debug/examples/gpio-rgbled`
    (HOST) INFO  flashing program (11 pages / 11.00 KiB)
    (HOST) INFO  success!
    ────────────────────────────────────────────────────────────────────────────────
    INFO  Starting blinky
    └─ gpio_rgbled::__cortex_m_rt_main @ examples/examples/gpio-rgbled.rs:35
See the repo on as a fork of the original repos. For the lazy, here is the source embedded into this page, this was extremely simple as it is basically a copy of the existing example gpio-blink
    // Turns the RGB Led red,green,blue,white,off in a loop
    // will work only for TTN Generic node with STM32WL5x
    // see https://github.com/TheThingsIndustries/generic-node-se

    #![no_std]
    #![no_main]

    use defmt_rtt as _; // global logger
    use panic_probe as _; // panic handler
    use stm32wlxx_hal::{
        self as hal,
        cortex_m::{self, delay::Delay},
        gpio::{pins, Output, PinState, PortB},
        pac,
        util::new_delay,
    };

    #[hal::cortex_m_rt::entry]
    fn main() -> ! {
        let mut dp: pac::Peripherals = defmt::unwrap!(pac::Peripherals::take());
        let cp: pac::CorePeripherals = defmt::unwrap!(pac::CorePeripherals::take());

        let gpiob: PortB = PortB::split(dp.GPIOB, &mut dp.RCC);
        let (mut red_led, mut green_led, mut blue_led): (Output<pins::B5>, Output<pins::B6>, Output<pins::B7>) =
            cortex_m::interrupt::free(|cs| {
                (
                    Output::default(gpiob.b5, cs),
                    Output::default(gpiob.b6, cs),
                    Output::default(gpiob.b7, cs),
                )
            });

        let mut delay: Delay = new_delay(cp.SYST, &dp.RCC);

        defmt::info!("Starting blinky");

        loop {
            for &level in &[PinState::High, PinState::Low] {
                red_led.set_level(level);
                delay.delay_ms(600);
                green_led.set_level(level);
                delay.delay_ms(600);
                blue_led.set_level(level);
                delay.delay_ms(600);
            }
        }
    }
And here is what it looks like: